Enable App Check in Flutter apps
Notice
This page is archived and might not reflect the latest version of the FlutterFire plugins. You can find the latest information on firebase.google.com:
https://firebase.google.com/docs/app-check/flutter/default-providers
This page shows you how to enable App Check in a Flutter app, using the default providers: SafetyNet on Android, Device Check on Apple platforms, and reCAPTCHA v3 on web. When you enable App Check, you help ensure that only your app can access your project's Firebase resources. See an Overview of this feature.
1. Set up your Firebase project#
Install and initialize FlutterFire if you haven't already done so.
Register your apps to use App Check with the SafetyNet, Device Check, and reCAPTCHA providers in the Project Settings > App Check section of the Firebase console.
You usually need to register all of your project's apps, because once you enable enforcement for a Firebase product, only registered apps will be able to access the product's backend resources.
Optional: In the app registration settings, set a custom time-to-live (TTL) for App Check tokens issued by the provider. You can set the TTL to any value between 30 minutes and 7 days. When changing this value, be aware of the following tradeoffs:
- Security: Shorter TTLs provide stronger security, because it reduces the window in which a leaked or intercepted token can be abused by an attacker.
- Performance: Shorter TTLs mean your app will perform attestation more frequently. Because the app attestation process adds latency to network requests every time it's performed, a short TTL can impact the performance of your app.
- Quota and cost: Shorter TTLs and frequent re-attestation deplete your quota faster, and for paid services, potentially cost more. See Quotas & limits.
The default TTL is reasonable for most apps. Note that the App Check library refreshes tokens at approximately half the TTL duration.
2. Add the App Check library to your app#
From the root of your Flutter project, run the following command to install the plugin:
Once complete, rebuild your Flutter application:
3. Initialize App Check#
Add the following initialization code to your app so that it runs before you
use any Firebase services such as Storage, but after calling
Firebase.initializeApp();
Once the App Check library is installed in your app, start distributing the updated app to your users.
The updated client app will begin sending App Check tokens along with every request it makes to Firebase, but Firebase products will not require the tokens to be valid until you enable enforcement in the App Check section of the Firebase console. See the next two sections for details.
4. Monitor request metrics#
Now that your updated app is in the hands of users, you can enable enforcement of App Check for the Firebase products you use. Before you do so, however, you should make sure that doing so won’t disrupt your existing legitimate users.
Realtime Database, Cloud Firestore, and Cloud Storage#
An important tool you can use to make this decision for Realtime Database, Cloud Firestore, and Cloud Storage is the App Check request metrics screen.
To view the App Check request metrics for a product, open the Project Settings > App Check section of the Firebase console. For example:
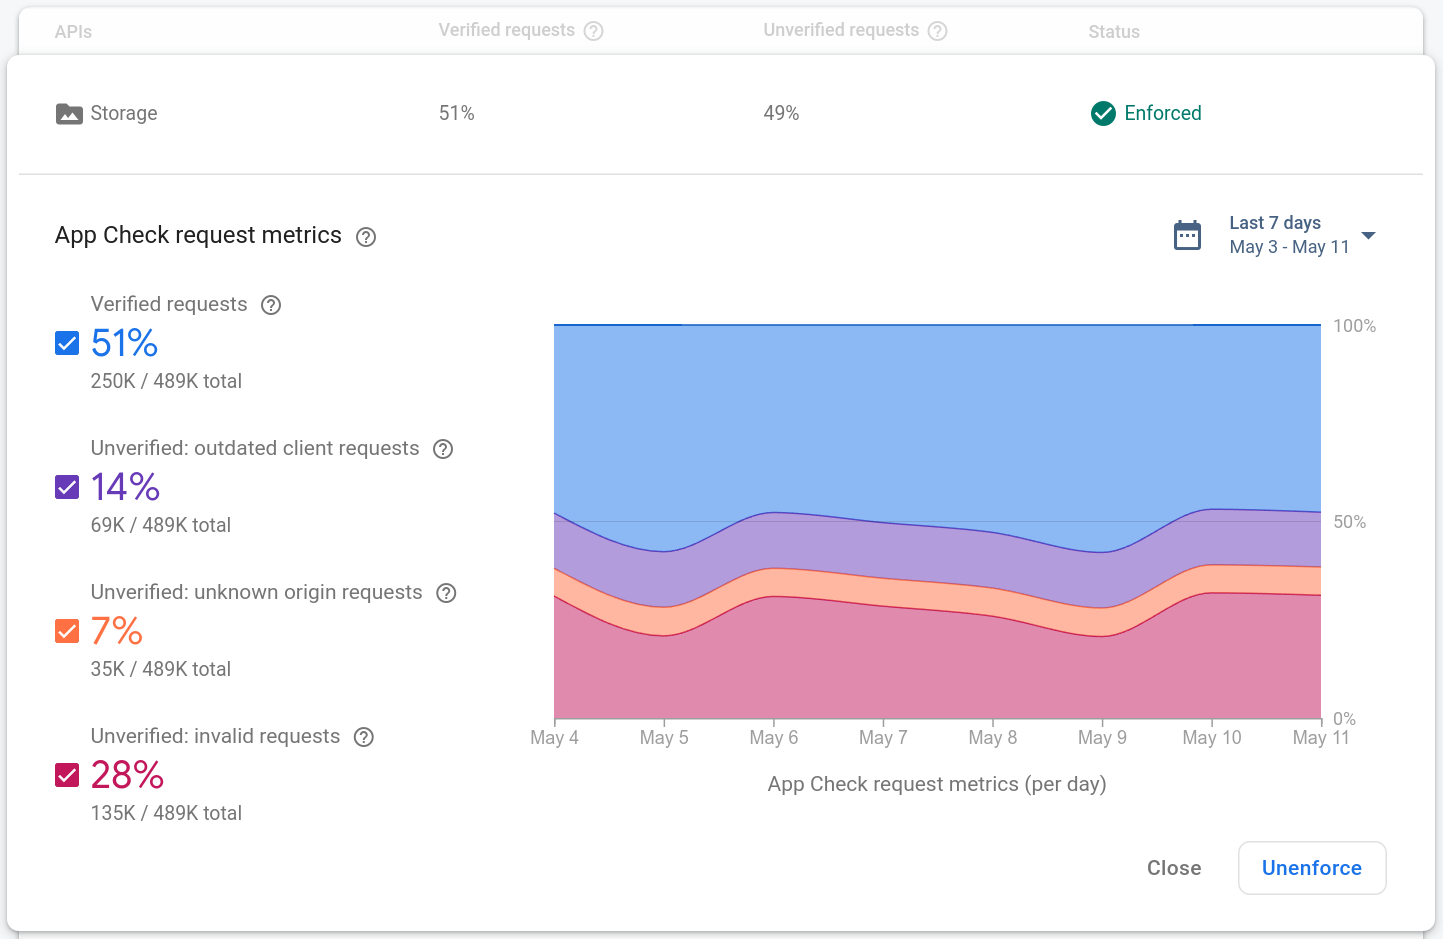
The request metrics for each product are broken down into four categories:
Verified requests are those that have a valid App Check token. After you enable App Check enforcement, only requests in this category will succeed.
Outdated client requests are those that are missing an App Check token. These requests might be from an older version of the Firebase SDK before App Check was included in the app.
Unknown origin requests are those that are missing an App Check token, and don't look like they come from the Firebase SDK. These might be from requests made with stolen API keys or forged requests made without the Firebase SDK.
Invalid requests are those that have an invalid App Check token, which might be from an inauthentic client attempting to impersonate your app, or from emulated environments.
The distribution of these categories for your app should inform when you decide to enable enforcement. Here are some guidelines:
If almost all of the recent requests are from verified clients, consider enabling enforcement to start protecting your backend resources.
If a significant portion of the recent requests are from likely-outdated clients, to avoid disrupting users, consider waiting for more users to update your app before enabling enforcement. Enforcing App Check on a released app will break prior app versions that are not integrated with the App Check SDK.
If your app hasn't launched yet, you should enable App Check enforcement immediately, since there aren't any outdated clients in use.
Cloud Functions#
For Cloud Functions, you can get App Check metrics by examining your functions' logs. Every invocation of a callable function emits a structured log entry like the following example:
You can analyze these metrics in the Google Cloud Console by creating a logs-based counter metric with the following metric filter:
Label the metric
using the field jsonPayload.verifications.appCheck.
5. Enable enforcement#
To enable enforcement, follow the instructions for each product, below. Once you enable enforcement for a product, all unverified requests to that product will be rejected.
Realtime Database, Cloud Firestore, and Cloud Storage#
To enable enforcement for Realtime Database, Cloud Firestore (iOS and Android), and Cloud Storage:
Open the Project Settings > App Check section of the Firebase console.
Expand the metrics view of the product for which you want to enable enforcement.
Click Enforce and confirm your choice.
Important: Cloud Firestore support is currently available only for Android and iOS clients. If your project has a web app, don't enable Cloud Firestore enforcement until web client support is available.
Note that it can take up to 10 minutes after you enable enforcement for it to take effect.
Cloud Functions#
See Enable App Check enforcement for Cloud Functions.
Next steps#
If, after you have registered your app for App Check, you want to run your app in an environment that App Check would normally not classify as valid, such as an emulator during development, or from a continuous integration (CI) environment, you can create a debug build of your app that uses the App Check debug provider instead of a real attestation provider.